Coconut-Filled Brownies

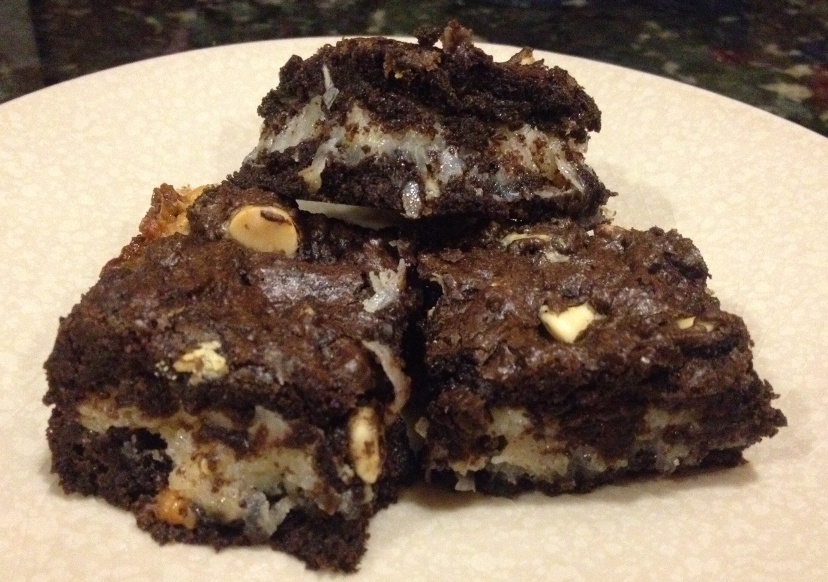
There’s just something about warm, fudgy brownies that helps me feel far less bitter when the pretty fall leaves begin to disappear and the weather suddenly turns markedly colder. Since I have a tendency to jazz up my brownies, I decided to take one of my basic recipes and add a chewy coconut layer.

These brownies are rich and super-sweet – so much so that even I, the self-proclaimed world’s biggest sweet tooth, could only eat one at a time. In fact, they kind of tasted like a Mounds candy bar in brownie form. If you’re a fan of coconut and love brownies, give this quick, easy recipe a try.

coconutbrownies

Coconut-Filled Brownies

Ingredients:

1 stick of butter, melted
1/2 cup granulated sugar
1/2 cup brown sugar (I used dark; light will also work)
1 large egg
1 tsp vanilla
1 cup AP flour
1/4 tsp salt
1/2 cup cocoa powder (I used Hershey’s Special Dark)
1/2 cup white chocolate chips (feel free to substitute with semisweet chips or omit)
1 and 1/2 cups sweetened coconut flakes
1/2 cup sweetened condensed milk

Method:

  1. Preheat your oven to 350 degrees. Grease an 8×8 baking pan and set aside.
  2. In a large bowl, whisk together the butter, sugars, egg, and vanilla. Set aside.
  3. In a small bowl, combine the flour, salt, and cocoa powder.
  4. Mix the dry ingredients into the wet until well-combined.
  5. Stir in chocolate chips.
  6. Pour half of the batter into your prepared pan.
  7. In a separate bowl, mix the coconut and condensed milk until thoroughly combined.
  8. Pour the coconut mixture over the brownie layer in the pan, using a spatula to spread it evenly. Then, pour the remaining half of the brownie batter on top of the coconut layer, once again using a spatula as needed to smooth.
  9. Bake for about 35 minutes, or until an inserted toothpick comes out clean. Let the brownies cool in the pan for at least an hour before slicing and serving.


Coconut M&M Blondies

Looking for an easy, kid-friendly treat? Try these blondies. They’re so simple, but so amazingly good. This recipe takes virtually no time to throw together, and you don’t need any fancy tools or anything like that. The hardest part for me was resisting the urge to nibble on M&Ms as I added them to my batter.

coconutmandmblondies

Coconut M&M Blondies

Recipe from RecipeGirl

Ingredients:

10 tablespoons unsalted butter, melted and cooled to room temp
1 cup packed dark brown sugar
1/4 cup granulated white sugar
1 large egg
2 teaspoons vanilla extract
1/4 teaspoon kosher salt
1 1/4 cups all-purpose flour
1 1/4 cups sweetened flaked coconut
1 cup M&Ms
1/2 cup chocolate chips

Method:

  1. Preheat your oven to 350 degrees. Spray an 8×8-inch pan with nonstick spray and then line the bottom with parchment paper.
  2. In a large mixing bowl, combine the butter and sugars.
  3. Stir in the egg, vanilla, and salt.
  4. Stir in flour, coconut, M&Ms, and chocolate chips until well-combined.
  5. Pour the batter into the prepared pan and smooth the top with a rubber spatula. Sprinkle a few additional M&Ms on top if desired.
  6. Bake for 25 to 30 minutes, or until an inserted toothpick comes out clean.
  7. Let the blondies cool completely in the pan before turning them out onto a cutting board and cutting into squares.

Pumpkin Whoopie Pies With Maple Cream Cheese Filling

In case you’ve never been fortunate enough to have a whoopie pie, you should only know how much these things rock. Imagine two moist, cakey discs surrounding a rich layer of creamy filling. Talk about yum.

I’ve been wanting to make classic whoopie pies for some time now but never got around to it, and since I’m currently deep in fall baking mode, I decided that my inaugural whoopie pie attempt would feature none other than pumpkin.

Though I was intimidated at first by the idea of making whoopie pies, especially without a designated whoopie pie pan, I wound up having absolutely no trouble with these. The cake itself came out springy and packed with flavor, and the frosting was the perfect accompaniment.

Now that I’ve dabbled in the world of whoopie pies, I may have to try the classic chocolate version one of these days. Because, you know, that’s what I need around my house – more cake.

pumpkinwhoopies

Pumpkin Whoopie Pies With Maple Cream Cheese Filling

Recipe From Lovin The Oven

Ingredients:

For the cakes:

3 cups all-purpose flour
1 tsp salt
1 tsp baking soda
1 tsp baking powder
2 TBSP cinnamon
1 tsp ground ginger
½ tsp ground fresh nutmeg
1 cup granulated sugar
1 cup dark brown sugar, firmly packed
1 cup canola oil
3 cups chilled pumpkin puree
2 large eggs
1 tsp vanilla extract

For the filling:

3 cups powdered sugar
½ cup unsalted butter, at room temperature
8 ounces cream cheese, at room temperature
3 TBSP maple syrup
1 tsp vanilla

Method:

  1. Preheat your oven to 350 degrees. Prepare 2-3 baking sheets lined with parchment paper.
  2. In a large bowl, whisk together the flour, salt, baking soda, baking powder, and spices. Set aside.
  3. In a separate bowl, whisk together the sugars and oil. Add the pumpkin puree and whisk to combine thoroughly. Add the eggs and vanilla and whisk until combined.
  4. Sprinkle the flour mixture over the pumpkin mixture and whisk until thoroughly combined.
  5. Use a small ice cream scoop with a release mechanism to drop heaping tablespoons of the dough onto the prepared baking sheets, about 1 inch apart.
  6. Bake for 10-12 minutes until the cakes are just starting to crack on top and a toothpick inserted into the center of a cake comes out clean.
  7. Remove from the oven and let the cakes cool completely on the pan while you make the filling.
  8. To make the filling, beat the butter until smooth with no visible lumps. Add the cream cheese an beat until combined.
  9. Add the powdered sugar, maple syrup, and vanilla, and beat until smooth.
  10. To assemble the whoopie pies, turn half of the cooled cakes upside down. Pipe filling onto each half, then place another cake, flat side down, on top of the filling. Press down slightly so that the filling spreads to the edges of the cake. Repeat until all cakes are used.
  11. Place the whoopie pies in the refrigerator for about 30 minutes to firm up. If you’re serving them right away, you can remove them once they’re firm and keep them stored at room temperature; otherwise leave them in the fridge, where they’ll keep for a couple of days.


Pumpkin Cheesecake

My mom makes the best cheesecake ever. I mean, I’ve had good cheesecake, but hers is just outstanding. In fact, my mom’s cheesecake is so good that rarely do I find myself motivated to make cheesecake myself. The only thing is that my mom is not the biggest fan of pumpkin, which means if I want pumpkin cheesecake, I either need to buy it or make it myself.

Now some people may find cheesecakes intimidating, but I can assure you that this recipe is really easy to pull off, especially if you own a stand mixer (and even you don’t, that’s okay – a hand mixer will do). I’ve actually made this cake several years but have no idea where the recipe came from (my apologies and thanks to whoever came up with it). If you’re a fan of both cheesecake and pumpkin, I definitely recommend giving this recipe a shot.

pumpkincheesecake

Pumpkin Cheesecake

Ingredients:

For the crust:

1 and 1/4 cups ginger cookie crumbs

1/4 cup butter, melted

For the filling:

Three 8-ounce packages of cream cheese, softened

1 cup granulated sugar

1 tsp cinnamon

1/2 tsp ginger

1/2 tsp nutmeg

2 cups pumpkin puree

4 large eggs

1 cup whipped cream for topping (optional, but recommended)

Method:

  1. Preheat your oven to 350 degrees.
  2. Combine the melted butter and cookie crumbs in a bowl. Once thoroughly combined, press the crumb mixture into the bottom of a 9-inch springform pan. Bake for 10 minutes, then remove from oven and cool for 15-20 minutes on a wire rack. While the crust is cooling, lower the oven temperature to 300 and start working on the filling.
  3. To make the filling, combine the cream cheese, sugar, and spices in a bowl and mix until smooth and fluffy.
  4. Add the pumpkin and mix well.
  5. Add in the eggs one at a time at a low speed, beating until just-combined.
  6. Spread the pumpkin filling evenly over the cooled crust and bake for one hour.
  7. After an hour, turn off the oven and open the door partway. Allow the cheesecake to sit in the opened oven for about 30 minutes, then transfer to a wire rack to cool for another 45-60 minutes.
  8. Cover the cheesecake and transfer it the refrigerator to chill for at least three hours.
  9. Remove the cheesecake from the fridge about 20 minutes or so before you want to serve it. I suggest topping it with whipped cream, but if you’re a purist, you can skip this step. The benefit of having a whipped cream topping is that it helps cover up any cracks that may have formed in your cheesecake. Oh yeah, and it tastes really good.

Pumpkin Cake With Maple Cream Cheese Frosting

It was my dad’s birthday the other day, so I decided to whip up a cake for the occasion. There’s only one problem: My dad doesn’t eat sugar, or at least he’s not supposed to. So in reality, when I say I made this cake for my father, I really mean that I made it for his lovely coworkers, who got to enjoy the majority of it while he limited himself to a couple of small bites.

This isn’t the first time I’ve made this cake, and I have to say, this recipe is really one of my all-time favorites. The cake itself is just really flavorful and moist, so much so that I don’t even think it needs the frosting. In fact, as was the case the last time I made it, I wound up with a bunch of extra frosting, which is now sitting in my refrigerator just waiting to be incorporated into a new dessert (there are worse problems to have).

Unfortunately, the photo below really doesn’t do this recipe justice, but I wasn’t able to get a shot of the cake once it was sliced. The candy corn pieces on top, by the way, are totally optional, and in fact don’t do anything other than add a little extra color. I wanted my cake to have a bit of a festive look, but next time around I’ll definitely be skipping this step.

If there’s one pumpkin dessert recipe you’ve got to try this season, it’s this cake. Believe me, you won’t be disappointed.

bestpumpkincake

Pumpkin Cake With Maple Cream Cheese Frosting

Recipe from David Leite

Ingredients:

For the cake:

1 stick unsalted butter, at room temperature, plus more for the pans
1 cup firmly packed dark brown sugar
1/3 cup granulated sugar
2 cups cake flour, plus more for the pans
2 teaspoons baking powder
1 teaspoon baking soda
1 teaspoon ground cinnamon
1 teaspoon ground ginger
1/2 teaspoon ground nutmeg
1/8 teaspoon ground cloves
1/2 teaspoon salt
1/4 teaspoon freshly ground black pepper
2 large eggs
1/2 cup buttermilk mixed with 1 teaspoon vanilla
1 1/4 cups canned solid-pack pumpkin

For the maple cream cheese frosting:

Two (8-ounce) packages cream cheese, softened
1 stick unsalted butter, at room temperature
2 cups confectioners sugar
1/4 cup pure maple syrup (if you have the good stuff, bust it out – it’ll be worth it)

Method:

  1. Preheat your oven to 350 degrees. Butter two 8-by-2-inch cake pans, line them with parchment circles, butter the parchment, and coat the pans with flour. Tap out the excess.
  2. In a stand mixer, beat the butter and sugars on medium speed until fluffy, about 5 minutes. Meanwhile, sift the flour, baking powder, baking soda, cinnamon, ginger, nutmeg, cloves, salt, and pepper into a medium bowl.
  3. Add the eggs, one at a time, scraping down the sides after each addition.
  4. Alternate adding the flour and milk mixtures, beginning and ending with the flour.
  5. Beat in the pumpkin until smooth.
  6. Divide the batter equally between the pans and bake for 30-40 minutes, or until an inserted toothpick comes out clean.
  7. Cool the pans on racks for 10 minutes, then invert the cakes onto racks and remove the parchment paper to cool completely.
  8. Once the cake has cooled, you can make the frosting. In a stand mixer, beat all the ingredients on medium until fluffy.
  9. Assemble the cake by frosting the top of one cake and then placing the other cake on top and frosting the sides and top.
  10. Refrigerate the cake for 30 minutes to allow the frosting to set.